Smart Mirror Senior Design 2: Simple Skin Lesion Localization
27 Jan 2018
The senior design project I have been working on in school is a “smart mirror”. Equipped with a thermal and RGB camera, its primary goal is to analyze a user’s face and give health feedback. The subsystem I was responsible for was image processing and my goal was to analyze the images to obtain health metrics. In this post, I go over analyzing skin images to locate lesions.
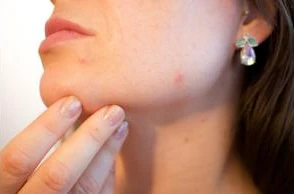 Many people have acne and other skim blemishes they may be self-conscious of. The smart mirror can help with that. Be more self-conscious, that is.
Skin Lesions
Skin lesions are areas of the skin that are abnormal in appearance, such as acne and moles. Being able to locate skin lesions would give a metric for our smart mirror to track skin health over time.
Process
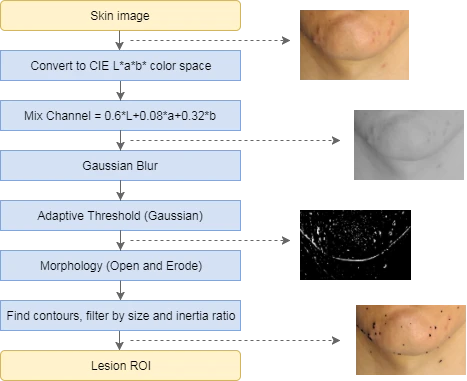 Diagram for the process of localizing skin lesions.
The process is inspired by a paper, “Acne image analysis: lesion localization and classification” .
An assumption of this process is that the input image is just skin and has already been extracted. The first step is to convert the image from BGR to CIE L*a*b* color space. Then three channels are mixed into one using weights that were found experimentally.
A guassian blur and adaptive thresholding is then applied. Why adaptive thresholding? Thresholding like Otsu’s method considers the entire image when choosing a threshold value, but does not work particularly well here because of uneven lighting conditions. Adaptive thresholding applies different thresholds for different regions of the image based on the local conditions of that region.
We are left with a binary image, white areas being the “blobs” that could be lesions. However, some will be too small or clumped together, so we apply open and erosion morphological transformations to filter them out.
Finally, we find contours (vectors of points that outline region-of-interest) of the blobs and filter those further by discarding those that are still too small or too elongated. All the contours left over should then correspond to skin lesions.
Parameters
There are parameters that should be adjusted depending on how dimension of the image and lesion size. These are: gaussian filter k-size, adaptive threshold block size, size of the morphological elements, and the minimum and maximum contour area. These parameters change if the image is large or if the lesions take up a large area of the image. You could apply several rounds of this process to detect a wider range of lesion sizes.
The weights of the channel mixing are parameters that can affect what kinds of blobs are detected. You can experiment with other color spaces and combinations of channels to detect different kinds of lesions. For example the Cr channel of the YCrCb color space does a pretty good job of detecting red lesions.
Corner Cases
This particular case is suppose to catch skin lesions that are darker than the surrounding skin. However, there are cases where the skin lesions are lighter than the surrounding skin. A reverse process could theoretically be applied where the same process is applied to an inverted image, but I never got around to experimenting with that.
This process also works less well when a flash had been used when taking the image. The bright white light reflects off the skin and obscures skin details like lesions. Ideally, images of the skin are taken in uniform lighting with no flash.
Github , which includes C++, OpenCV code and example output results for several skin images.