Smart Mirror Senior Design 1: Skin Temperature From Thermal Images
19 Dec 2017
The senior design project I have been working on in school is a “smart mirror”. Equipped with a thermal and RGB camera, its primary goal is to analyze a user’s face and give health feedback. The subsystem I was responsible for was image processing and my goal was to analyze the images to obtain health metrics. In this post, I go over getting a skin tempeprature metric from thermal images.
 Ever wanted your mirror to tell you if you’re catching a fever? No? Okay, well…
Skin Temperature
Skin temperature was an interesting health metric to try and capture because it could perhaps approximate internal body temperatures. Changes in body temperature may be reflect some sort of health concern, such as a fever. In retrospect, I had no idea if skin temperature, as measured by a thermal camera, had any useful correlation with body temperature changes that are a cause of concern. Seems like an interesting question to have answered first, but this being a silly little senior design project, it was glossed over.
Process
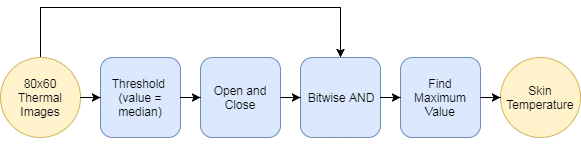 Diagram for the process of getting skin temperature.
The thermal images come from a FLiR Lepton and have dimensions of 80x60 pixels. Each pixel has a value and the higher the value means the hotter the temperature. I used these images to try and approximate skin temperature value.
Altough it may be intuitive to just take the highest value as the skin temperature, it is not guaranteed that a person will be the warmest object in the image. There may be a light bulb, a candle, or a cup of coffee in the background. Therefore, some simple image processing techniques are needed to remove these “hot spots”.
The first step is to find the median of the thermal image and use it as the value for a threshold . There are several other threshold values to choose from e.g. the average pixel value or using Otsu’s method. I use the median because it is less affected by very hot or cold objects caught in the image. With a threshold, any pixel with a value over that value will be white and any under will be black. Here I refer to the white part as the “mask”.
 Visualized Process: Original, Thresholded, Open+Close, and Orginal Masked
The mask needs to be ‘adjusted’, so the second step is to apply some morphological transformations . The first is called an open and it will remove smaller white areas caused by warm background objects. The second transformation is called a close and it does exactley what it sounds like; any holes in the mask caused by colder objects like glasses or thick beards will be closed up.
Now the mask approximately covers the person in the image. The final step is to use this to “mask” the original image and only look for the highest pixel value in that area. This highest value will then be our skin temperature metric and the process is complete.
Corner Cases
My assumption is that the there is one person in the image and that they are the prominent figure in the image. Any object hotter than skin that is in front or on the edge of that person will not be removed from the mask and cause an inaccurate reading. The person should also consistently either wear or not-wear glasses. This is because the glass blocks one of the warmest areas of the face from the view of the thermal camera i.e. one reading without glasses may be higher than without.
Github , for C++, OpenCV code.